Fall Directed Study - Week 7

In the seventh week of the last semester of my graduate school career I made a few adjustments to my gallery scene and continued building and sculpting my Warrior.

First, I changed the proportions of a couple of items in the reading nook of my gallery environment according to critique that I received from Tareq last week: I revised the couches in the reading nook by making the back cushions thinner and their overall height a bit shorter; then I enlarged the table between the two couches slightly so that it was a little more proportional to its surroundings. 

I also spent the week UVing and baking normal maps for the sculpted gallery pieces, but I haven't gotten them into Modo so that I can get images of the items with the normal maps on them yet. (I'm stuck on arranging wood pieces in the fireplace because I foolishly laid all of those out before UVing the initial model, and the fire log's one of the few pieces in the gallery that I've sculpted and normal-mapped, so it needs UVs...) Once I get that done, however, I expect the gallery to be finished quite quickly.

The next thing that I did was to continue work on my Warrior character model. He now has a sword, scabbard, and helmet to go with the other pieces that I modeled for him previously, and he is also now UVed and sculpted about as far as I can go before breaking symmetry. I'm almost ready to pose him and then finish sculpting things like an actual facial expression and folds on his cloak before moving on to sculpting a wood-like surface-texture on him. I intend to give him some knots and gnarls and nicks of the type that might be left by a chisel or carving knife. Basically, I'm going to rough him up and make him look more organic - more like a wooden sculpture rather than a pristine 3D model.


As far as the state that he's in now: I know that his muscle lines are quite strong at the moment - I will remedy that later (there's actually a method to my madness on that). Also, the many places where the geometry of his armor is intersecting his body and other pieces of the outfit are intentional as well. He's supposed to be carved all from one large piece of wood, so I figured that things like the helmet and greaves and whatnot would be carved right onto the surface of his body rather than clearly delineated as separate pieces the way that they would if he were supposed to be a more realistic character. I just wasn't mad enough to try to model and sculpt them all as one piece... There is also an unsculpted ear in one of the head-shots which I have no intention of detailing: I originally modeled the character's base mesh with an ear, and then when I was modeling the helmet it occurred to me that you will never see that ear. The helmet's supposed to be built onto his head, so it's never coming off. Hence, I actually removed the ear from the mesh to cut out the extra polygons when I UVed the character, but when I projected the sculpted detail back onto the UVed mesh it of course transferred the appearance of an ear back onto the head. I have actually smoothed that section out a bit since I took these screen shots, but I have no intention of making any further efforts to remove it completely. So, in the end: yes, there are unsculpted ears on the high-res character, but I'm leaving them alone because they'll never be visible.

That is, unfortunately, all of the progress that I have to show for week seven. I've been working so hard lately that I got a bit burnt out and am afraid that I slacked off a bit this week. I would have had more progress to show if I'd worked more diligently, but I guess that everyone needs a break sometime. I'm just sorry that I chose to take one so close to a possible deadline...

Fall Directed Study - Week 3

At the beginning of my third week of directed study I took a day off from sculpting my Addict and worked on building my Gallery structure. I built the walls as panels that I could duplicate around the room, but I had a bit of an issue with the curvature of the round room.

If I built the walls at a low resolution as I originally planned, the shape of the room would still be perfectly round everywhere once I welded the panels together and smoothed them except at the windows, where I was forced to put in extra edge loops to fit the window frames into the panels. The portions of the wall with the windows would have lost their perfect roundness and instead become slightly faceted as the extra edge loops held the geometry in place rather than letting it spread out evenly in perfect roundness. I was concerned that if this happened you would see the unevenness in the way the light hit the walls near the windows, even from fairly far away as my renders of the gallery will be.

My other option was to build the walls at a higher resolution, with vertical edge loops holding the definition of the curve all along the length of the wall at the same interval as existed between the edge of each panel and the edge loop defining the position of the window frame. All of the vertical edge loops would still be evenly spaced, and the curve of the wall wouldn't pucker from extra edge loops breaking the rhythm of the curve. The problem with this option is that it seems overkill to have high-res walls. Walls shouldn't have to be high-res: they're flat blank spaces with no detail to speak of. It seems ridiculous to have high resolution walls... In the end, however, I went with the ridiculous. I couldn't bear the thought of modeling the whole beautiful gallery only to be unhappy with the way that it renders because the curvature is slightly off at the windows and causing errant highlights on the otherwise-perfect roundness of my room. (Despite my best efforts, I did end up with extra vertical edge loops around the window frames as necessary holding edges, but you can't even see their influence in the curvature of the walls because the close intervals of the other vertical edge loops across the rest of each wall panel makes their influence so minimal that it's not even visible.)

I spent quite a bit of time building the walls and windows: making the flat glass window panels fit into window frames on curved walls, modeling the trim around the window that holds the glass into place, making sure that the different panel pieces connect correctly... In the end, I wound up with five different window/wall panels to duplicate in various positions around the room: One blank wall piece, one full window piece, one wall piece with trim to finish off a window frame on the right, one wall piece with the trim to finish off a window frame to the left, and one wall with trim to finish window frames on both sides. You see, each window panel ends in the middle of the trim so that, when the windows connect, there's no wall area between them. This, of course, means that when a bank of windows ends the next wall panel needs half the width of trim on the edge to finish off the window next to it. Hence: five panels.


The last thing that I did in my gallery was block in the columns and major furnishings. This process actually caused me to resize and slightly reproportion my room when I discovered how little room I had left for the reading nook. The way I see it, your average couch is probably around five feet in length; when I made my couches that long they took up very nearly the entire floor space of the reading nook, leaving no space to actually access the bookshelves. So, I thought again. I moved the five-foot couch place-holders over to the reading nook area of the floor plan, then resized the floor plan image plane to fit them, leaving enough room to walk around and between the couches to navigate the nook area. Then I scaled the walls up evenly to fit the newly resized floor plan. I then scaled the height of the walls back down so that my ceilings weren't ridiculously high. In a room this grand, I do want high ceilings, but not completely, outrageously high. I've decided on an eight inch crown molding at nine feet with the actual ceiling topping out at twelve feet. I've been in houses with nine foot ceilings before and they're really nice, but I think that in a forty-five foot in diameter room (which is what the gallery turned out to be after resizing for the nook) they'd make the space feel just a little bit claustrophobic; so I settled on twelve foot ceilings. I then spaced out place holders for the columns and bookcases surrounding the reading nook, and that was the end of my work for the day.

For the next few days, I finished sculpting my Addict:


Tareq had mentioned when I turned in my last week's progress that the character's wrists looked broken: that the hands met the arms at the wrong angle. I worked to remedy that problem, then went on to finish sculpting the face, refining the hands, and sculpting the divisions into the forearm sleeves. Then I exported the 2nd subdivision level character mesh, unfolded the UVs a bit, and baked my normal maps:


I was concerned that I was going to get a lot of problem areas in the normal map where the geometry of one part of the body pressed against the geometry of another part in the pose that he's in (i.e.: the fingertips pressing against the face, the back of the thighs pressing against the calves, the inner elbows pressing against themselves), but, surprisingly, I had very few issues. I did end up separating out some pieces of the high- and low-res meshes and re-baking normal maps for certain areas (such as the face) and compositing the new maps into the the full body one, but I didn't have to do this for nearly as many pieces as I expected to: most of the anomalies in the map were able to be fixed with just a bit of healing brush application in Photoshop.

Then I started work on the color map.

The image above took about a day's worth of work to complete - a very full day of work, but a day nonetheless. In this map, nearly all of the precise divisions are done. The shoulder pads and the ears still have to be subdivided according to the information in the normal map, but the rest of the precise linework is done. It looked great on the model:

I figured that it would take another day or so to complete the designs in the color section on his body. After all, the designs are just doodling - most of the precise work was done. 

Oh, how wrong I was...

Fall Directed Study - Week 1

Well, I'm in the home stretch: the first week of my final semester has passed (and, boy, do I have a lot of work still to do...).

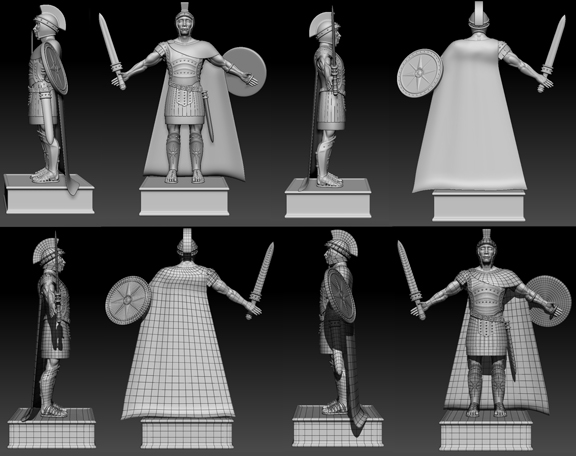
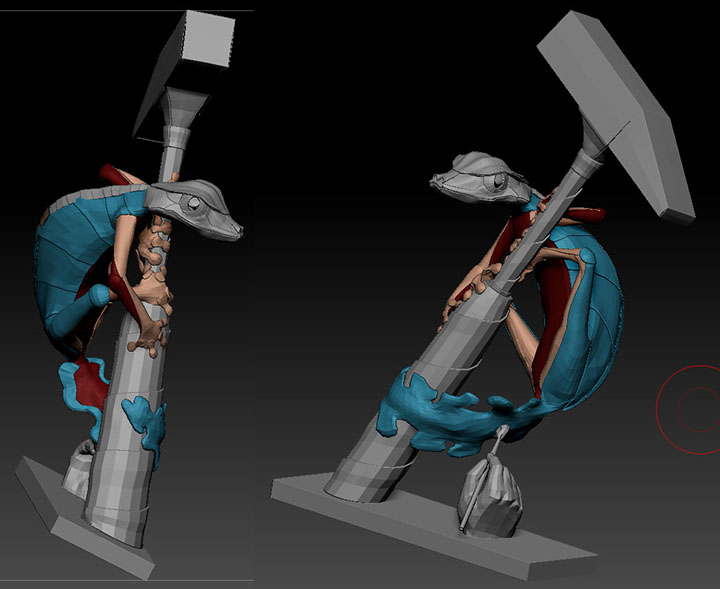
On a very positive note: I finished my Juggler! Finally! It only took about 8 times longer than I thought it would...

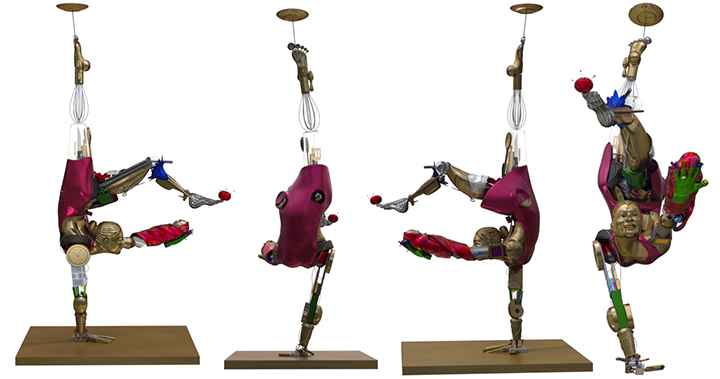
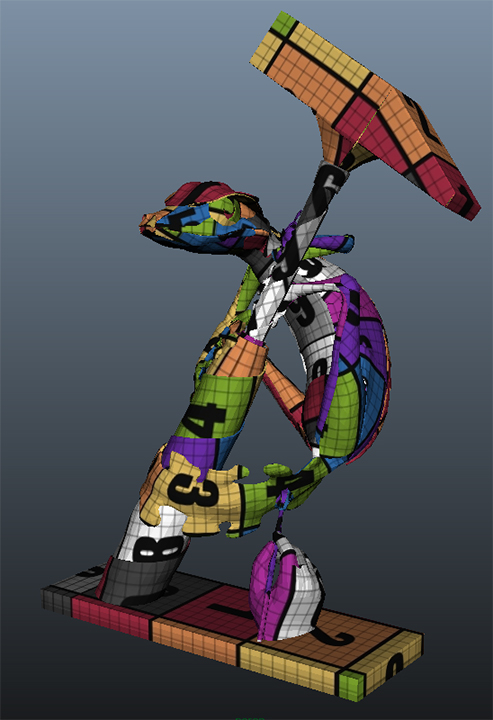
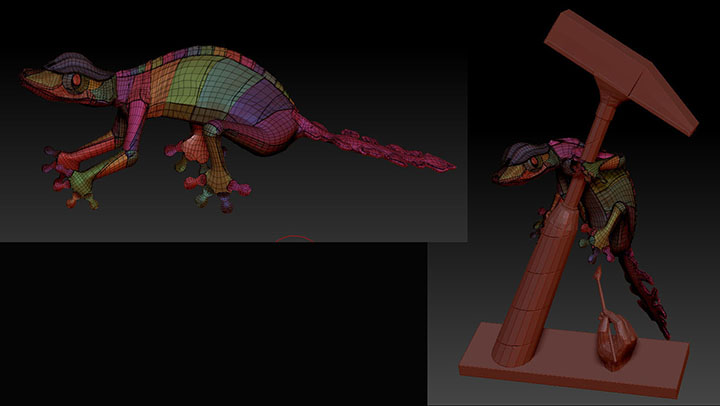
I learned a lot creating this model; it was much more complex than anything I've ever modeled before. When I planned my thesis schedule I'd only ever made character models that were one to ten pieces depending on whether they had mechanical parts or clothing or just one solid body. I'd never made anything composed of 60 different objects, many of which are made up of multiple pieces themselves. I had no idea of the scope of what I was taking on when I signed up for this, but I am thoroughly pleased with the results.

I actually had a lot of technical difficulties while on my vacation, so the vast majority of the final work on this model was done after I returned home. I had quite a bit of trouble baking out usable normal maps of all of my ZBrush sculpting on the more organic objects, but I eventually figured out how to remedy that by compositing multiple maps of the same object baked with different envelope sizes together and using healing brushes in Photoshop. I spent a lot of time baking those maps in Maya and more time compositing them, but eventually I was able to move on and bring everything into Modo, which was where my real trouble began.

I had too many textures. Too many normal maps, too many color maps, too many reflections to be calculated on too many different pieces: Modo didn't want to handle my scene. The real-time render preview kept freezing and crashing the program. I eventually figured out a way to work in which I hid the textures on every object except the limb or even just the individual piece that I was working on; then I was able to make some progress.

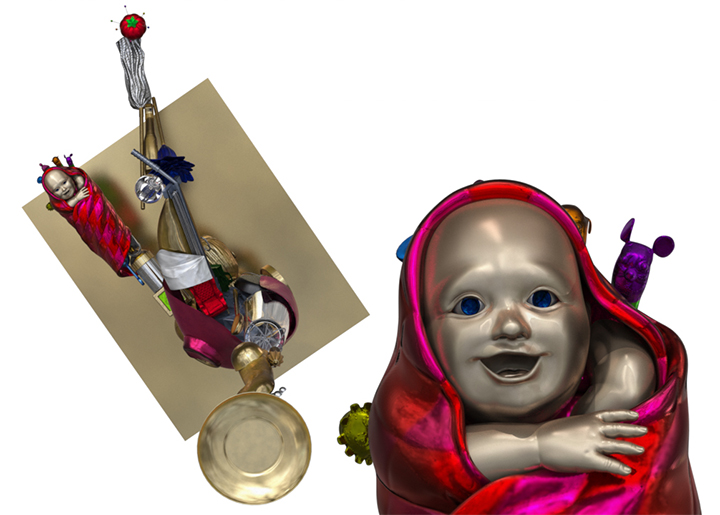
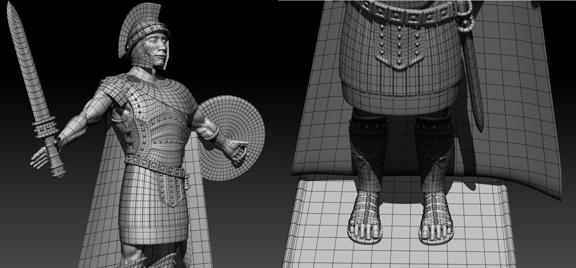
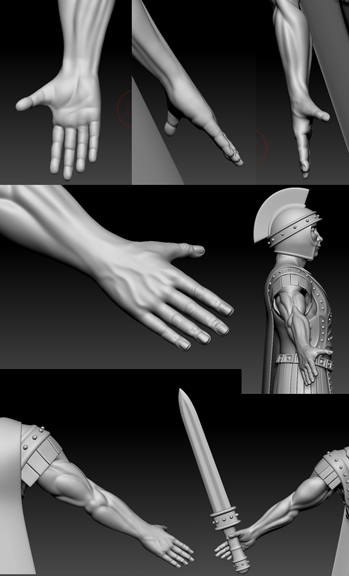
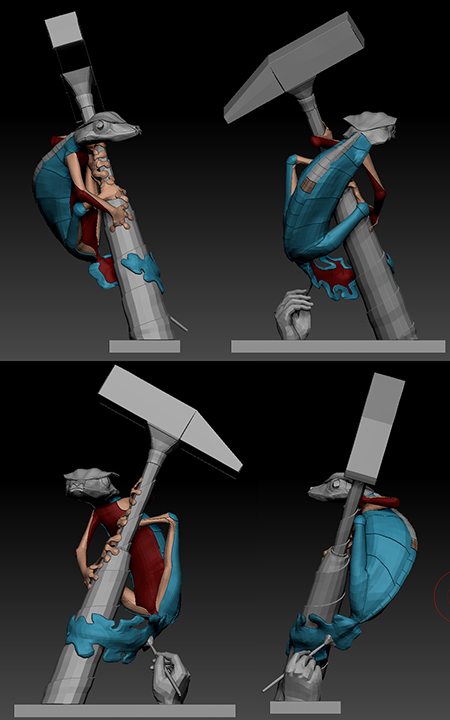
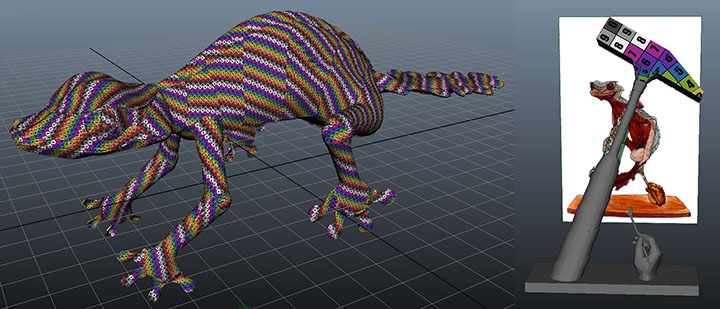
I gave all of my final objects the appropriate metal textures (many of which I had only to duplicate from other pieces which I had already designated to have the same material), then I began trying to tone down the uber-shiny metal look. It took a lot of trial and error, but eventually I came up with a combination of noise and gradient masks that made the metal look a little less perfect than it started out to be. I then applied variations of these masks to each and every one of the well over 100 different textures that I have applied to the model. It was a time-consuming process, but well worth it; everything still looks metallic to me, but like metal that's spent a little time out in the world, not like a shiny new penny hot off the press:

Some of the noise masks in the above images are still a bit extreme - you can tell that they're noise rather than grime - but I toned them down after seeing these renders. I haven't made new renders yet because it's a bit more of an ordeal to go through to set the renders up than I'd like to deal with right now. I have to open the file in the "modeling" tab which doesn't have the render preview screen built in, turn off all of the textures (which I've put into groups by body area to make the process easier), switch to the "render" tab and position my camera in the render preview window, switch back to the modeling tab, and then go straight to the final "render" from the drop-down menu without seeing the textured preview first. Then, if I need to change views I turn all the textures off and do it all again. It's the only way it works. My computer is good, but it doesn't contain enough ram to let Modo calculate this textured model moving in the preview render screen. I've just got too much going on in it. The final renders, however, calculate much faster than I expected them to given how much trouble I'm having with the preview renders.

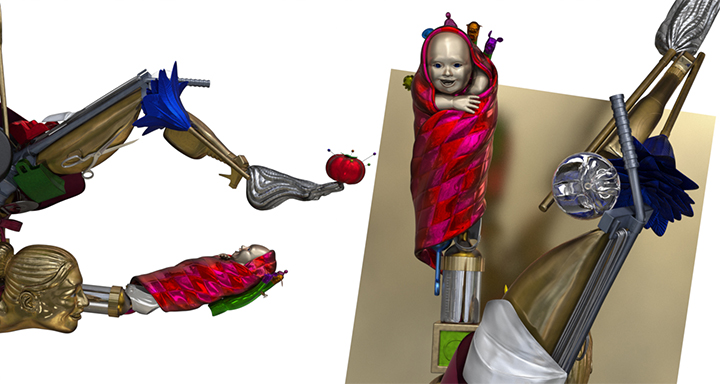
Overall, I'm happy with my Juggler. There are still a few things about her that I would like to tweak: I'd like to add some bump maps of etched designs on quite a few of the objects that make her up. I might change a few colors around. I don't think her head is holding its normal map quite as well as I would like: she lost a little bit of volume from what's there in my actual ZBrush sculpt. The apron has a similar problem: I sculpted wrinkles in the fabric that just aren't showing up as much as I'd like with that pink metal texture. I think that my "grime" masks made her just the tiniest bit too dark for what I'd prefer... But these are little things. I think it's important for me to move on now and finish the rest of my thesis. If I can come back and fix them later after I finish the rest: fantastic, but I can't deal with it now. She's 95% to where I want her to be; it's time to call it "good enough" and bring the rest of my project to completion. I could have as long as a month left in the semester after I present my thesis project - I can tweak the little things then.

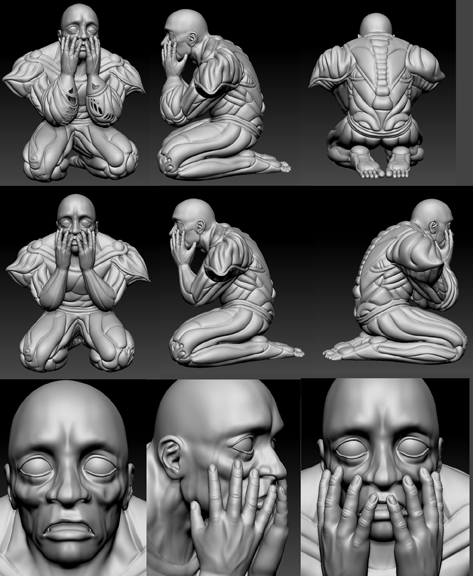
So, I've moved on to my Addict. This is the state that I left him in back in the spring:

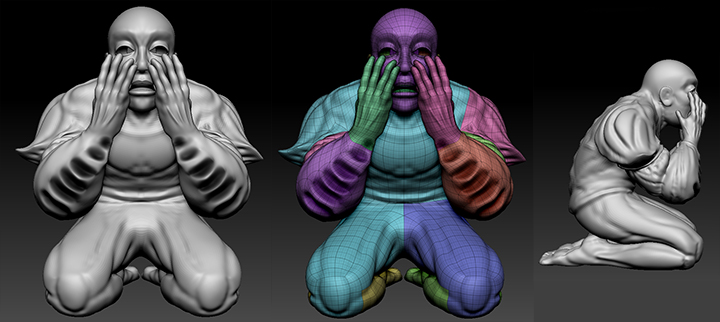
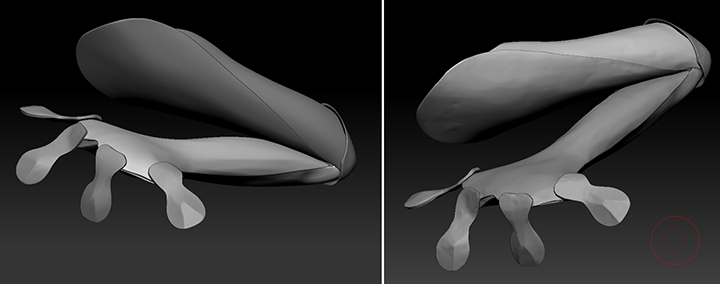
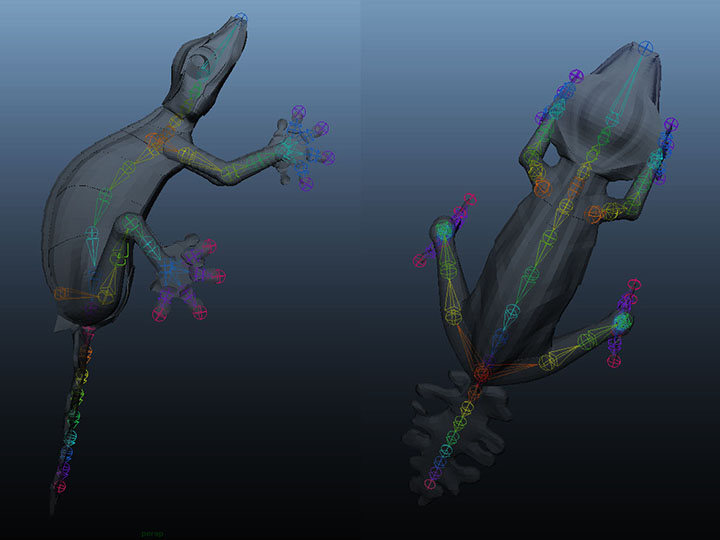
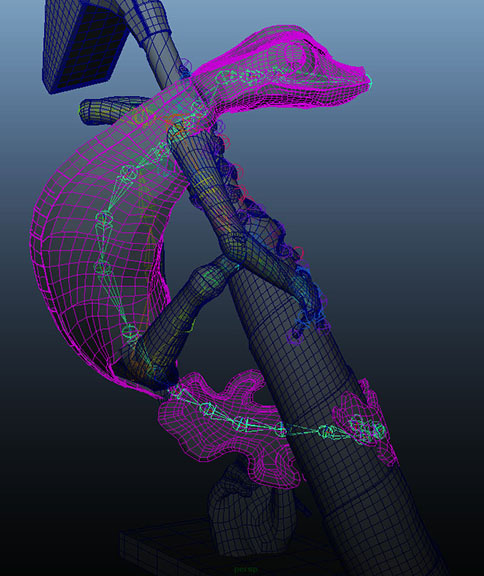
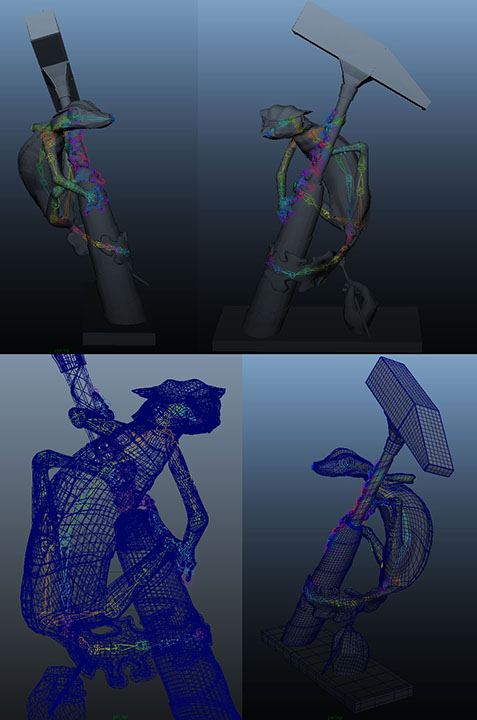
I kept having trouble with the holes in his sleeves. I thought that I could just hollow out the distance between his arm and his inner sleeve in ZBrush, but I hadn't really made the topology to support the right shapes for that. Looking back at it earlier this week I decided it was no good: I had to re-do it. With all of the experience that I gained from the Juggler I looked at this model and saw numerous areas where I was going to have major issues baking out normal maps, even if I managed to fight the topology and sculpt the right shapes in ZBrush. The thing is, I shouldn't have to be fighting the topology: it should be flowing with my sculpting, and the more that I studied this model the more that I knew that wouldn't be the case. So, I went back to my most recent version of him in Maya and re-made his arms. And his toes. And tweaked his hands and his shoulder pads. And fiddled with a few other issues that I found. Then I divided him into the appropriate groups once more and brought him back into ZBrush where I blocked in his sculpting again. This is his current state:

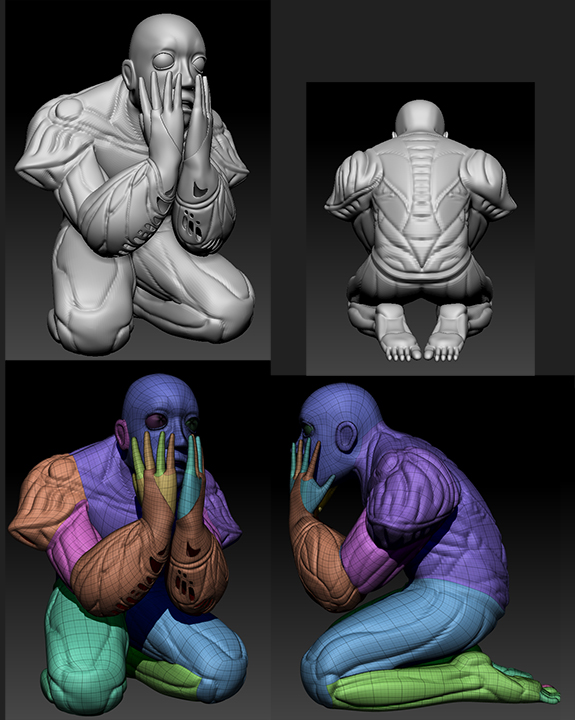
As you may be able to tell, I made each of his sleeves below the elbow into separate pieces from the rest of the body and built the holes into the mesh: it seemed the only way to get it to work properly. I also gave him real, individual toes rather than one solid block to be sculpted into toes. I'm a bit concerned that the model that I modified was not actually my most recent base mesh of the character, but it was the latest one that I found a file for. I'm concerned because the posture differs slightly from the version that I was sculpting before, and there was a row of unmerged vertices in an area that I hadn't modified that instantly separated when I brought the revised mesh back into ZBrush. I took it back into Maya and fixed it, obviously, but I keep wondering what else is different between the two meshes. Were there problems with the mesh that I made modifications to that had been fixed on the version that I'd previously been working on in ZBrush? I've already noticed quite a difference in the shape of the eyes between the two meshes, and am not sure if that's something that I'd fixed in the base mesh in Maya or simply by utilizing the move brush in ZBrush on the first model. I'm going to try refining the eye shape of the new model in ZBrush, but I'm concerned that I'll get into sculpting it and then notice something big enough to cause me to have to go back to revise the base mesh again...

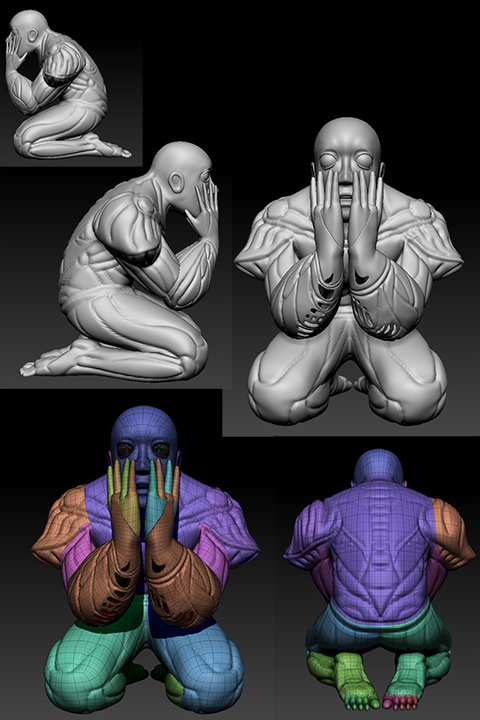
I'm going to progress on the theory that that's not the case, however, and hope that I can just move on from here and get this character sculpted and begun texturing within the week. I don't see anything particularly wrong with the mesh, just things that are different from the previous version, and I know that I tweaked the previous version quite a bit to get the posture right, so it concerns me if that work failed to follow through to the revised character. I think it's ok though: from what I can see now he still looks right to me, so I'm going to continue sculpting him and just make sure that I keep a close eye on his overall shape. Hopefully, when I post in another week, he'll be nearly done.

Summer Directed Study - Week 4

Directed Study - Session 7

I finished posing my Gecko. The following screen shots are actually from just before I finished the posing fully. The grey pieces of the ridge down the Gecko's back and the "bristles" of the paintbrush are still not fixed in these images, but they were fixed within an hour or two of the file from which I took these screen shots being saved. The colors were basically a system of organization that I was using to denote my posing progress. The code was really quite simple: if the panel was colored, it had been properly posed. If it wasn't colored, it either needed no adjustment or was still waiting to be adjusted.

The ridge and the bristles were fixed by the time that I made this turntable as a placeholder image in my demo reel for one of the classes that I'm currently taking: 

  As I explained in my previous blog post, I posed the Gecko with a series of smooth-bound rigs in Maya, but I fixed any areas where the resultant geometry  panels were penetrating each other using the move brush in ZBrush. It was the latter step that I completed this week.

Directed Study - Session 8

I lost all of my Gecko's UVs.

Luckily, this wasn't as big of a disaster as it sounds: I was able to recover them. It was a tedious, time consuming process to do so, but not nearly as time consuming as having to re-UV everything. The Gecko and his base together have 115 pieces. It would have taken me a couple of days worth of work to build all of those UVs over again. Instead, it only took a couple of hours to transfer the UVs piece by piece from the last version of the Gecko that was not-quite-fully-posed in Maya to the fully posed OBJs that I pulled out of ZBRush.

I learned something new about ZBrush this week: It deletes your UVs when you merge and split subtools. I was not aware of this. I've combined and separated meshes without any ill effects in Maya so often that I never even suspected it could be a problem in ZBrush. Apparently, it's a big problem - assuming, of course, that you care about UVs.

I do care. I care very much.

As I stated, however, I was at least able to recover them thanks to a script that my roommate has for Maya. I will be obtaining this script from her for future use very shortly. In the meantime, she let me use her computer to transfer all of the UVs back onto my posed Gecko. Then I had to go through all of the UVs and unfold them to account for any stretching that the pieces endured during the posing process. This is the step that I had been intending to complete when I first discovered that the UVs were missing: it wasn't an extra step to go through because they were lost. I was actually surprised by how long this step took. Relaxing and unfolding UVs sounds so easy, but I guess doing anything 230 times (115 objects x2 UV shells each) won't be the quickest of propositions. I also spent a good chunk of time arranging the UV shells in the UV space so that when I eventually get around to texturing the Gecko (which is not part of my thesis, but is still something that I hope to do eventually) I will easily be able to tell from the UV snapshot which pieces are which:

I then spent some time exporting the UVed pieces of the Gecko and base in very small groups as OBJs so that I can have multiple subtools in ZBrush without threatening my UVs. I can work on even overlapping panels on the same subtool individually using polygroups, but I still don't want too many panels on the same subtool, so I had to create quite a large number of OBJs.

Basically, most of the work that I got done this week was tedious and time consuming technical tasks that I don't have a whole lot of visual progress to show for, but which needed to be done, regardless.

I did begin sculpting finally, but just barely. Can you see it in the image below?

I didn't think so.

How about now?

These are two of the three sculpting techniques that I tried. The left one was completed using only the hPolish brush in ZBrush. The right one was completed with a combination of hPolish and Blob set to scatter. I like the right one. The left image is the progress that I showed in my GDS class. Then my GDS instructor mentioned how the hammer used in shaping sheet metal would create dings and rough up the surface of the metal significantly. He suggested trying to rough the surface up in Maya by selecting random pixels to move to break up the smooth surfaces. He suggested that it might be faster than ZBrush sculpting and the eventual normal map creation to show off the ZBrush sculpting in another rendering program and all of that. He may be right, but I really wasn't happy at all with my experiment with the method that he suggested. So I settled on ZBrush. His suggestions did make me realize, however, that even with the polishing the ZBrush version was a little too perfect still. It needed to be a little more banged up. That's when I brought in the Blob brush. It creates some nice random dings in the surface. I polish some of them back down, and others I leave as they are. I don't spend too much time on any one section: it's supposed to be random and imperfect. I think that this method of working is serving me well, and will give me the look that I want for the piece overall. Now I just need to roll with it and get to work.

Summer Directed Study - Week 3

Directed Study - Session 5

My Gecko's UVs are done. I still have some UVs to create for the base, but the creature itself is done:

 And these are all of the pieces:

It was a lot of work.

Altogether the Gecko model is made up of 98 individual pieces. Luckily, I didn't have to UV each and every one of those pieces because the Gecko was still in a neutral, symmetrical pose; I was therefore able to UV all of the pieces along the center and on one side, then duplicate the UVed pieces that repeat from one side to the other. I think that I probably ended up UVing about three-quarters of the Gecko because so many of its pieces are along the center line, but not having to UV that 1/4 was worth it, especially since my Maya likes to crash when the UV texture editor is open for some reason. UVing is therefore always a tedious, nerve-wracking process for me. I save often lest the program crashes and I lose all of the work that I just did.

  I learned a couple of things about my Gecko while UVing:

First and foremost: he was going to deform a lot more than I had anticipated during posing. UVing allowed me to study his structure again, which I hadn't really looked at since I built him at the beginning of the year. I built him with lots of bent joints intentionally so that things wouldn't have to change position too much when I posed him. This was a good move, I believe, but still not as effective as I thought it might be. His neck had to bend so that he's looking forward rather than at the sky. One of his arms had to pull back significantly at the shoulder. His hands and feet were built with palms facing each other and soles facing each other: they all needed to rotate ninety degrees. There were a lot of little things like that. I had been planning to rig the Gecko in Maya by parenting his pieces to joints to pose him because I didn't think that he'd need to deform much, but, clearly, I was wrong. I decided to try ZBrush's Transpose Master instead of Maya for posing.

The second thing that I discovered was that I hated the way that I'd built the Gecko's tail. It was messy. The geometry wasn't performing the way that I wanted it to. It had lost the sharp edges that it was supposed to have to denote the cut ends of the sheet metal. I just wasn't happy with it. So, I deleted half of the tail's geometry and rebuilt it in Maya. It took quite a while because the only way that I could see to do it involved a lot of pixel-pushing, but it was worth it. I'm much happier with it now.

After completing the Gecko's UVs and the rebuild of the tail, I decided to take a break from UVing the base and put the Gecko into ZBrush to test his polygroups and begin to pose him. I figured that since the base doesn't change at all in the posing, I can UV it anytime before I actually begin sculpting. This is as far as I got:

I fixed the interpenetrating pieces in the Gecko's face again before I started posing (which is the work that I had somehow lost around the time of my last blog entry), because I was certain that it would be easier to do with symmetry still in play. I didn't expect his face to deform too much in the posing, so I thought that I would save myself some work by fixing these details before sculpting. I didn't bother too much with the rest of the body because I knew it would deform enough in posing that I'd just have to fix it again later.

Directed Study - Session 6

It was a good thing that I didn't get very far into my ZBRush posing, because I learned a much better way to pose my Gecko in my next GDS class: a skeleton joint rig with a smooth bind to his "skin" (metal plates).

I kept the pieces of the rig separate so that I would have better control over the points where the limbs met the main body. As such, I had one rig that served as the spine smooth-bound to all of the pieces of the Gecko's head, neck, back, abdomen, and tail. I had another rig smooth-bound to each of his arms, and another smooth-bound to each of his legs. (Five rigs in total.) I had to amend the rigs and start the posing over a number of times as I came to better understand how the rigs deformed, but the image above was the final set-up that I ended up using. Then it was just a matter of matching him up to the image planes showing his character design as best I could. This was the result:

I made one change from the Gecko's original character design: I wrapped his tail around the front of the hammer rather than the back. The tail seemed to follow the flow of the spine better that way, as well as providing some extra ballast, rather than having all of his weight on the far side of the hammer. 

Next, I'll fix the places where the plates are cutting into each other using the move brush in ZBrush. Then I'll begin sculpting.