Well, I'm in the home stretch: the first week of my final semester has passed (and, boy, do I have a lot of work still to do...).
On a very positive note: I finished my Juggler! Finally! It only took about 8 times longer than I thought it would...
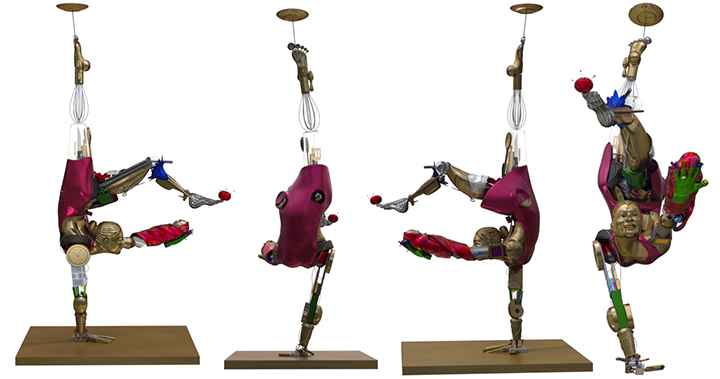
I learned a lot creating this model; it was much more complex than anything I've ever modeled before. When I planned my thesis schedule I'd only ever made character models that were one to ten pieces depending on whether they had mechanical parts or clothing or just one solid body. I'd never made anything composed of 60 different objects, many of which are made up of multiple pieces themselves. I had no idea of the scope of what I was taking on when I signed up for this, but I am thoroughly pleased with the results.

I actually had a lot of technical difficulties while on my vacation, so the vast majority of the final work on this model was done after I returned home. I had quite a bit of trouble baking out usable normal maps of all of my ZBrush sculpting on the more organic objects, but I eventually figured out how to remedy that by compositing multiple maps of the same object baked with different envelope sizes together and using healing brushes in Photoshop. I spent a lot of time baking those maps in Maya and more time compositing them, but eventually I was able to move on and bring everything into Modo, which was where my real trouble began.
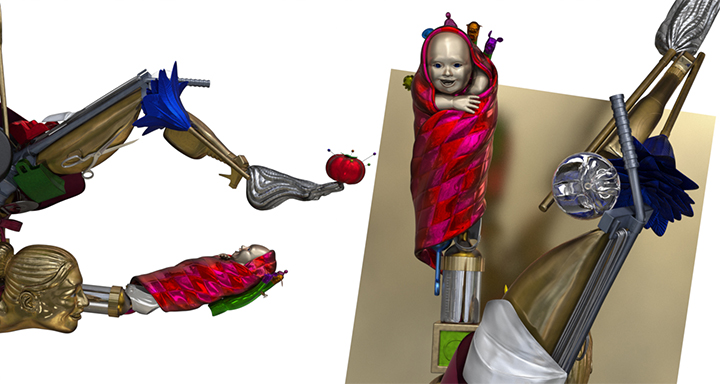
I had too many textures. Too many normal maps, too many color maps, too many reflections to be calculated on too many different pieces: Modo didn't want to handle my scene. The real-time render preview kept freezing and crashing the program. I eventually figured out a way to work in which I hid the textures on every object except the limb or even just the individual piece that I was working on; then I was able to make some progress.
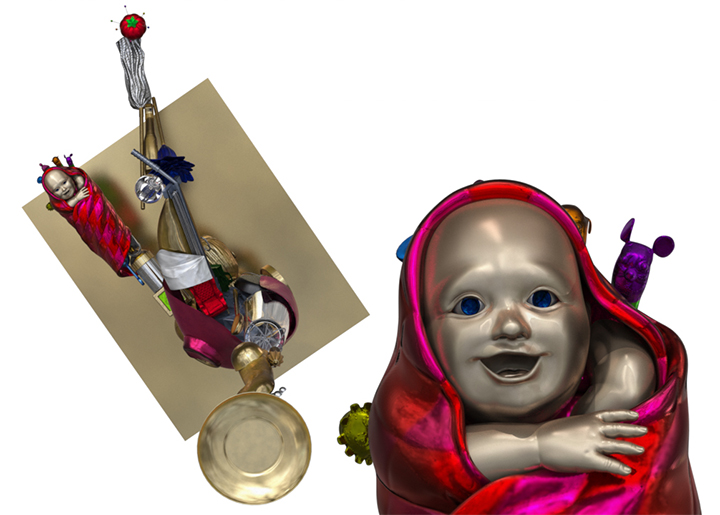
I gave all of my final objects the appropriate metal textures (many of which I had only to duplicate from other pieces which I had already designated to have the same material), then I began trying to tone down the uber-shiny metal look. It took a lot of trial and error, but eventually I came up with a combination of noise and gradient masks that made the metal look a little less perfect than it started out to be. I then applied variations of these masks to each and every one of the well over 100 different textures that I have applied to the model. It was a time-consuming process, but well worth it; everything still looks metallic to me, but like metal that's spent a little time out in the world, not like a shiny new penny hot off the press:

Some of the noise masks in the above images are still a bit extreme - you can tell that they're noise rather than grime - but I toned them down after seeing these renders. I haven't made new renders yet because it's a bit more of an ordeal to go through to set the renders up than I'd like to deal with right now. I have to open the file in the "modeling" tab which doesn't have the render preview screen built in, turn off all of the textures (which I've put into groups by body area to make the process easier), switch to the "render" tab and position my camera in the render preview window, switch back to the modeling tab, and then go straight to the final "render" from the drop-down menu without seeing the textured preview first. Then, if I need to change views I turn all the textures off and do it all again. It's the only way it works. My computer is good, but it doesn't contain enough ram to let Modo calculate this textured model moving in the preview render screen. I've just got too much going on in it. The final renders, however, calculate much faster than I expected them to given how much trouble I'm having with the preview renders.
Overall, I'm happy with my Juggler. There are still a few things about her that I would like to tweak: I'd like to add some bump maps of etched designs on quite a few of the objects that make her up. I might change a few colors around. I don't think her head is holding its normal map quite as well as I would like: she lost a little bit of volume from what's there in my actual ZBrush sculpt. The apron has a similar problem: I sculpted wrinkles in the fabric that just aren't showing up as much as I'd like with that pink metal texture. I think that my "grime" masks made her just the tiniest bit too dark for what I'd prefer... But these are little things. I think it's important for me to move on now and finish the rest of my thesis. If I can come back and fix them later after I finish the rest: fantastic, but I can't deal with it now. She's 95% to where I want her to be; it's time to call it "good enough" and bring the rest of my project to completion. I could have as long as a month left in the semester after I present my thesis project - I can tweak the little things then.
So, I've moved on to my Addict. This is the state that I left him in back in the spring:
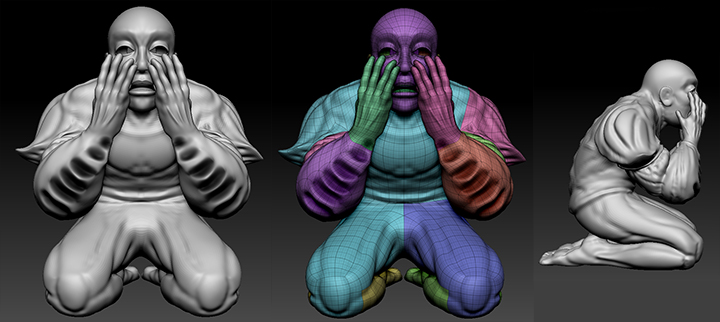
I kept having trouble with the holes in his sleeves. I thought that I could just hollow out the distance between his arm and his inner sleeve in ZBrush, but I hadn't really made the topology to support the right shapes for that. Looking back at it earlier this week I decided it was no good: I had to re-do it. With all of the experience that I gained from the Juggler I looked at this model and saw numerous areas where I was going to have major issues baking out normal maps, even if I managed to fight the topology and sculpt the right shapes in ZBrush. The thing is, I shouldn't have to be fighting the topology: it should be flowing with my sculpting, and the more that I studied this model the more that I knew that wouldn't be the case. So, I went back to my most recent version of him in Maya and re-made his arms. And his toes. And tweaked his hands and his shoulder pads. And fiddled with a few other issues that I found. Then I divided him into the appropriate groups once more and brought him back into ZBrush where I blocked in his sculpting again. This is his current state:
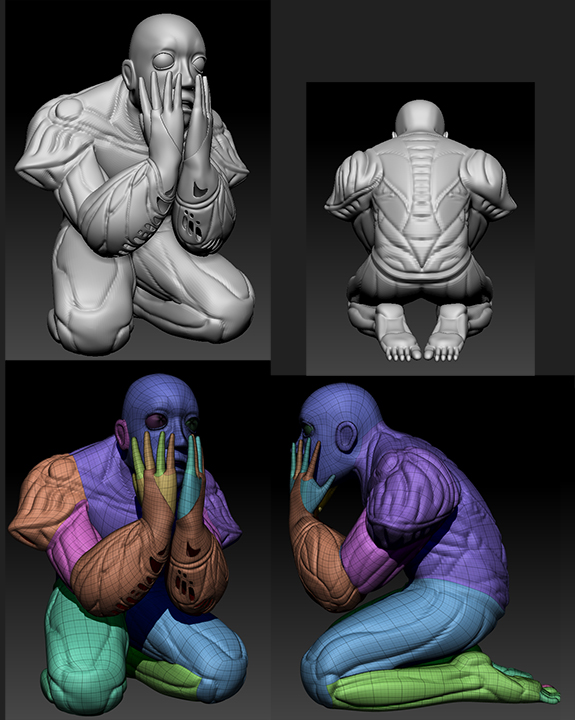
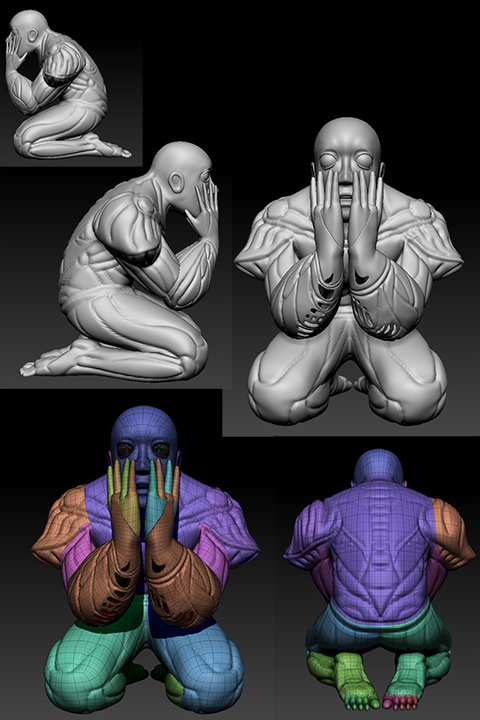
As you may be able to tell, I made each of his sleeves below the elbow into separate pieces from the rest of the body and built the holes into the mesh: it seemed the only way to get it to work properly. I also gave him real, individual toes rather than one solid block to be sculpted into toes. I'm a bit concerned that the model that I modified was not actually my most recent base mesh of the character, but it was the latest one that I found a file for. I'm concerned because the posture differs slightly from the version that I was sculpting before, and there was a row of unmerged vertices in an area that I hadn't modified that instantly separated when I brought the revised mesh back into ZBrush. I took it back into Maya and fixed it, obviously, but I keep wondering what else is different between the two meshes. Were there problems with the mesh that I made modifications to that had been fixed on the version that I'd previously been working on in ZBrush? I've already noticed quite a difference in the shape of the eyes between the two meshes, and am not sure if that's something that I'd fixed in the base mesh in Maya or simply by utilizing the move brush in ZBrush on the first model. I'm going to try refining the eye shape of the new model in ZBrush, but I'm concerned that I'll get into sculpting it and then notice something big enough to cause me to have to go back to revise the base mesh again...
I'm going to progress on the theory that that's not the case, however, and hope that I can just move on from here and get this character sculpted and begun texturing within the week. I don't see anything particularly wrong with the mesh, just things that are different from the previous version, and I know that I tweaked the previous version quite a bit to get the posture right, so it concerns me if that work failed to follow through to the revised character. I think it's ok though: from what I can see now he still looks right to me, so I'm going to continue sculpting him and just make sure that I keep a close eye on his overall shape. Hopefully, when I post in another week, he'll be nearly done.